


It's great you're getting started with KoboToolbox! Here's how to create an account:
1. Go to the KoboToolbox website:
- You'll need to decide which server you want to use. KoboToolbox offers two main options:
- Global Server:
kf.kobotoolbox.org- This is the most common choice. - European Union Server:
eu.kobotoolbox.org- Choose this if your organization requires data to be stored within the EU.
- Global Server:
- Go to the website of the server you prefer.
2. Sign up:
- Look for a "Sign Up" or "Create an Account" button, usually located on the homepage or in the menu. Click on it.
3. Fill in the registration form:
- You'll need to provide some basic information, such as:
- Your full name
- A username (make sure it follows the guidelines provided by KoboToolbox, usually lowercase letters, numbers, and underscores)
- Your email address
- Your organization's name (if applicable)
- A strong password
4. Activate your account:
- KoboToolbox will send an activation email to the address you provided. 1 1. Creating an account on KoboToolbox

support.kobotoolbox.org
- Go to your email inbox and find the activation email (check your spam folder if you don't see it).
- Click on the activation link in the email. This will confirm your registration and log you in to your new KoboToolbox account.
Important Notes:
- Choose the right server: Once you create an account on a specific server (Global or EU), you can't transfer your projects or data to the other server. So, make sure you choose the one that best suits your needs.
- Username guidelines: Pay close attention to the username requirements. It often needs to be all lowercase, without spaces or special characters.
- Strong password: Choose a strong and unique password to protect your account.
- Activation email: If you don't receive the activation email, check your spam or junk folder.
That's it! You've successfully created your KoboToolbox account. Now you can start creating forms, collecting data, and analyzing your results.
If you have any trouble with the process, don't hesitate to check the KoboToolbox support documentation or reach out to their support team for assistance.
KoboToolbox offers a few different server options to cater to various needs and preferences. Here's a breakdown of the main ones:
1. Public Servers:
- Global Server: This is the most commonly used server. It's hosted by KoboToolbox and is suitable for most users. If you don't have specific data residency requirements, this is likely the best option for you. You can access it at
kf.kobotoolbox.org. - European Union Server: This server is hosted in Ireland and is designed for organizations that need their data to be stored within the European Union. If your organization has strict data privacy regulations requiring EU data residency, you should choose this server. You can access it at
eu.kobotoolbox.org.
Key Considerations When Choosing Between Public Servers:
- Data Residency: If you have specific requirements about where your data is stored (e.g., within the EU), choose the appropriate server.
- Collaboration: All users working on the same project must use the same server. So, if you're collaborating with others, make sure everyone creates their accounts on the same server.
2. Private Servers:
- KoboToolbox also offers private server options for organizations with more complex needs. These servers are dedicated to a single organization and offer increased control, security, and customization. They are a good choice for large organizations with high data volumes, specific security requirements, or the need for custom branding. However, private servers come with a cost.
Which Server Should You Use?
- For most individual users and small teams: The Global Server is usually the best choice. It's easy to use and provides all the basic features you need.
- If you need your data to be stored within the EU: Choose the European Union Server.
- For large organizations with complex needs: Consider a private server.
Important Note:
- You cannot transfer projects or data between different servers. So, it's essential to choose the right server when you create your account.
If you're still unsure which server to use, it's always a good idea to contact KoboToolbox support for guidance. They can help you assess your needs and make the best decision for your situation.
Creating a new survey form in KoboToolbox is a straightforward process. Here's a step-by-step guide:
1. Log in to your KoboToolbox account:
- Go to the KoboToolbox website for the server you're using (either
kf.kobotoolbox.orgfor the Global Server oreu.kobotoolbox.orgfor the EU Server). - Enter your username and password to log in.
2. Create a new project:
- Once logged in, you'll see a list of your projects.
- Click the "NEW" button.
- You'll be presented with a few options:
- Build from scratch: Choose this if you want to create a new form using the formbuilder.
- Use a template: Select this if you have a template you want to use as a starting point.
- Upload an XLSForm: This option is for importing a form you've created in XLSForm (a spreadsheet-based format). 1 1. Getting started with XLSForm - KoboToolbox documentation
support.kobotoolbox.org
3. Choose "Build from scratch" to create a new form:
- Enter a Project Name and a Description for your survey.
- You can optionally choose a Sector and Country for your project.
- Click CREATE PROJECT.
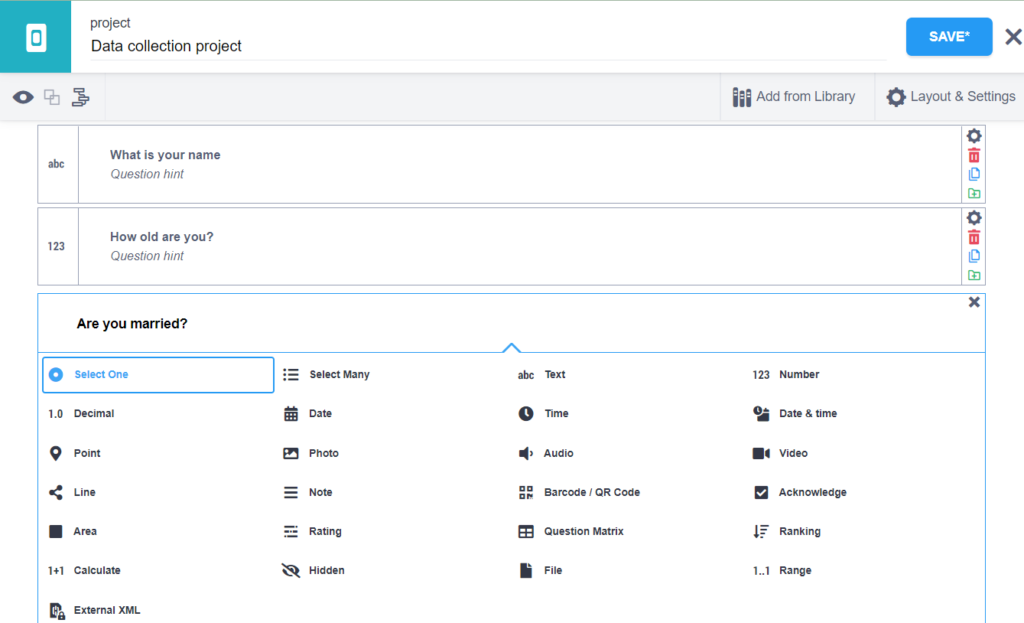
4. Start building your form:
- You'll be taken to the formbuilder interface.
- To add a question, click the "+" icon.
- Enter the question text (what you want to ask).
- Choose the question type from the dropdown menu (e.g., text, number, multiple choice, select one, etc.).
- Configure any additional settings for the question, such as:
- Required: Make the question mandatory.
- Constraints: Set rules for the type of data that can be entered.
- Choices: For multiple choice questions, add the answer options.
- Logic: Use skip logic or branching to show or hide questions based on previous answers.
- Click ADD QUESTION to add the question to your form.
5. Continue adding questions:
- Repeat step 4 to add all the questions you need for your survey.
- You can rearrange questions by dragging and dropping them.
6. Preview your form:
- Click the Preview button to see how your form will look to respondents.
- Test the functionality of your form, including any skip logic or calculations.
7. Save your form:
- KoboToolbox automatically saves your progress, but it's always a good idea to click the Save button to ensure your work is saved.
8. Deploy your form:
- Once you're happy with your form, click the Deploy button.
- This will make your form live and ready for data collection.
Tips for creating effective survey forms:
- Keep it concise: Avoid asking unnecessary questions.
- Use clear and simple language: Make your questions easy to understand.
- Group related questions: This makes the survey easier to follow.
- Test your form thoroughly: Before deploying, make sure everything works as expected.
By following these steps, you can create a new survey form in KoboToolbox and start collecting valuable data for your research or project.
The humanitarian server (kobotoolbox.org) is intended for projects that primarily serve humanitarian purposes.
The non-humanitarian server (kf.kobotoolbox.org) is for all other projects. The features are generally the same, but the servers are hosted separately
Yes, KoboToolbox supports offline data collection.
Data can be collected on mobile devices using the KoboCollect app (Android) or Enketo (web-based). Once an internet connection is available, the data can be uploaded to the server.
KoboToolbox provides basic data analysis tools within its interface. You can also export your data and use other statistical software like R, SPSS, or Excel for more advanced analysis.