
QGIS for Beginners: What It Is and How to Install and Use It
For anyone stepping into the world of mapping, Special Analysis or Geoscience QGIS often becomes first name they hear. This is not surprising. QGIS has grown into the most powerful open-source GIS platforms available today. It offers flexibility of premium GIS software without high licensing cost, making it favourite among students, researchers, startups, environmental analysts, and professionals across multiple industries.
For those who are new to this platform, QGIS for Beginners is designed specifically to cater to your needs. With various tutorials available, QGIS for Beginners makes learning efficient and enjoyable.
As you delve into QGIS for Beginners, you will discover its user-friendly interface, which is perfect for those just starting their journey into GIS.
Geographic Information Systems (GIS), have become essential tools for environmental studies, urban planning, agriculture, disaster management, telecom planning, and countless data-driven decisions. Among the many GIS tools available today, QGIS stands out as one of the most powerful, flexible, and beginner-friendly platforms. It is completely free, open-source, and trusted by professionals across the world.
The combined guide will help you to understand
- What is QGIS and why it is so widely used?
- How to install QGIS step by step, a complete tour of the QGIS interface including toolbars, panels, and menus.
What is QGIS?
QGIS, Quantum Geographic Information System, is an open-source software used to create, edit, analyze, visualize, and interpret geospatial data. It allows users to work with maps, satellite images, coordinates, layers, and complex spatial data sets with ease.
Why QGIS is popular?
- Free to use with no license restrictions.
- Support a wide range of formats like shapefile, KML, GeoJSON, CSV, TIFF, DEM, etc.
- Comes with 1000+ plugins that extend its capabilities, extremely flexible and customizable work on the Windows, Mac, and Linux trusted by researchers, government agencies, NGOs, and corporates.
Why beginners should use QGIS?
QGIS is best platform for beginners because it has clean and logical interface. Most tools are easy to learn. There are plenty of online tutorials and community support. It gives beginners exposure to real-world GIS workflows.
How to install QGIS? step-by-step guide
Furthermore, QGIS for Beginners offers a myriad of resources that ensure you can easily understand complex concepts.
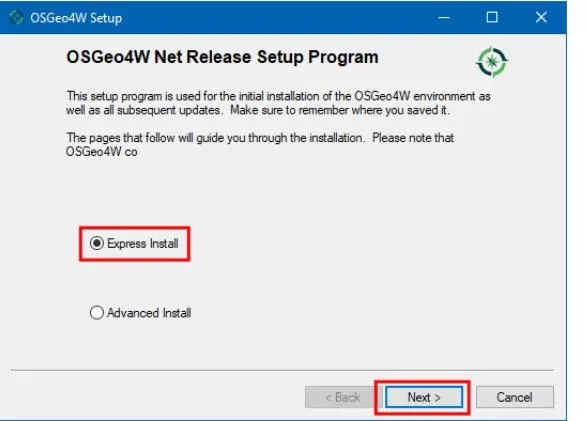
Step 1. Visit the official QGIS website.
With QGIS for Beginners, you will find step-by-step guides that simplify the installation process.
Go to qgis.org. è Click Download Now.
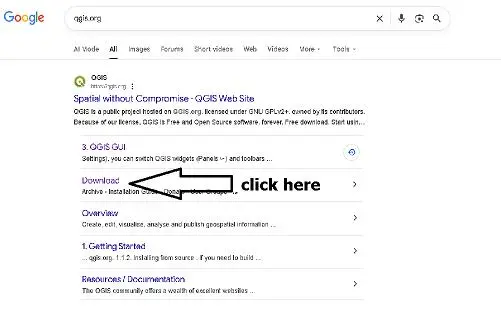
For QGIS for Beginners, the official website is a great place to start your learning journey.
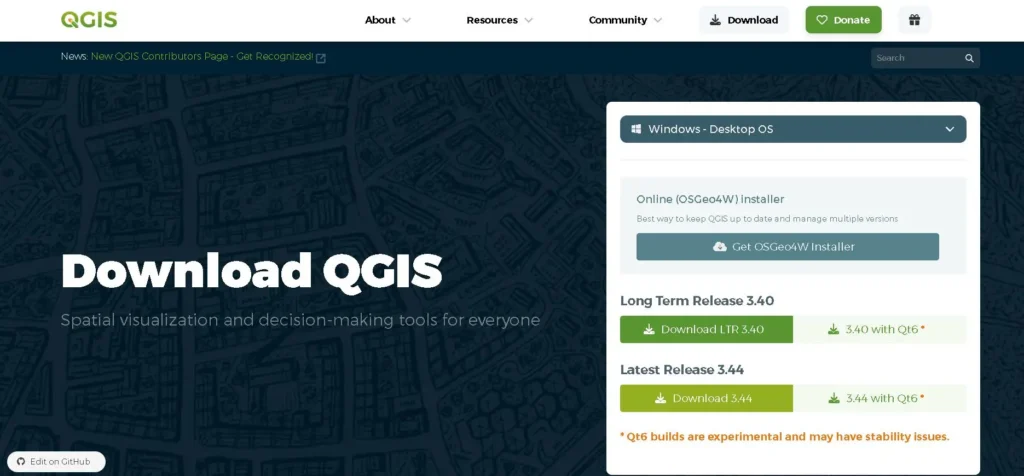
Step 2. Choose the correct version.
In the case of QGIS for Beginners, selecting the correct version is crucial for optimal experience.
With QGIS for Beginners, you can easily navigate the different operating system requirements.
You will see two main options. Long-term releases. (LTR). Most stable. Recommended for beginners.
Latest releases Contains newest features. Slightly experimental.
Once you have installed QGIS for Beginners, the next step is to familiarise yourself with its features.
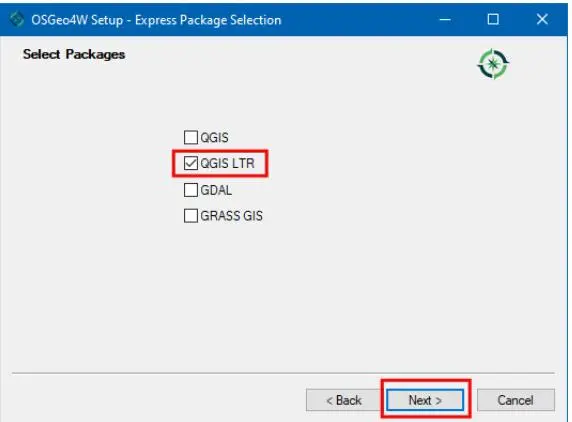
Step 3. Select your operating system.
Choose your system. In bracket Windows. Slash Mac OS. Slash Linux. For Windows, select QGIS. Standard. Standalone. Installer. 64-bit.
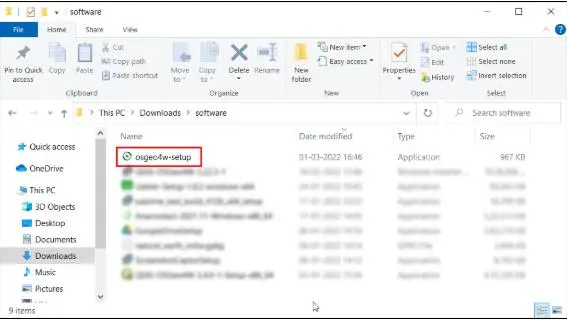
Step 4. Run the installer.
Double-click the .exe file. Click Next. Accept terms. Select installation folder. Click Install.
In this guide, QGIS for Beginners will help you understand how to launch the software effectively.
As you explore the QGIS for Beginners interface, remember that it’s designed with newcomers in mind.
Step 5. Launch QGIS.
Understanding the QGIS for Beginners layout will streamline your learning process.
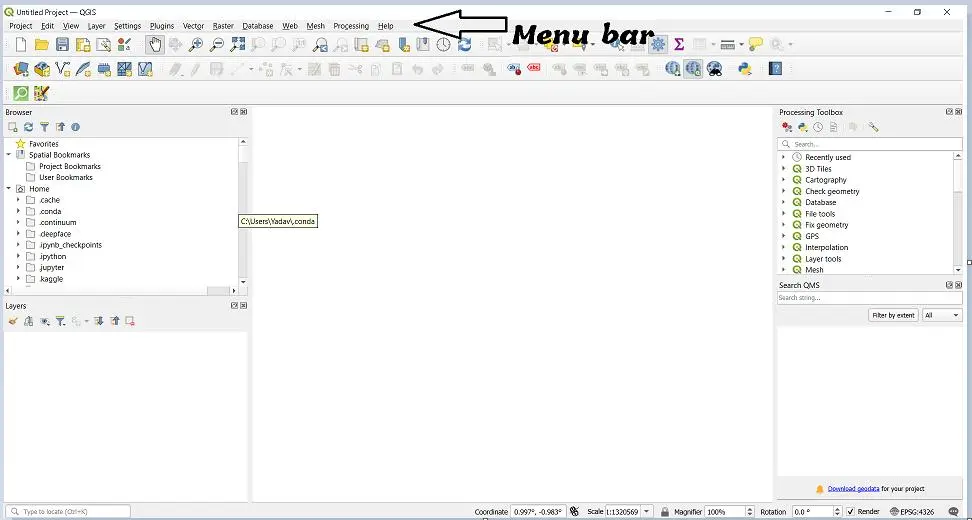
Search QGIS Desktop in your Start Menu and open it.
Understanding the QGIS interface: a complete tour.
The first time you open QGIS, the interface may seem overwhelming, but every part has a specific purpose.
Below is a complete breakdown:
The QGIS main window layout. QGIS is divided into following sections:
The toolbars in QGIS for Beginners provide quick access to commonly used features.
- Menu bar,
- toolbars,
- panels like layers panel, browser panel,
- map canvas,
- status bar.
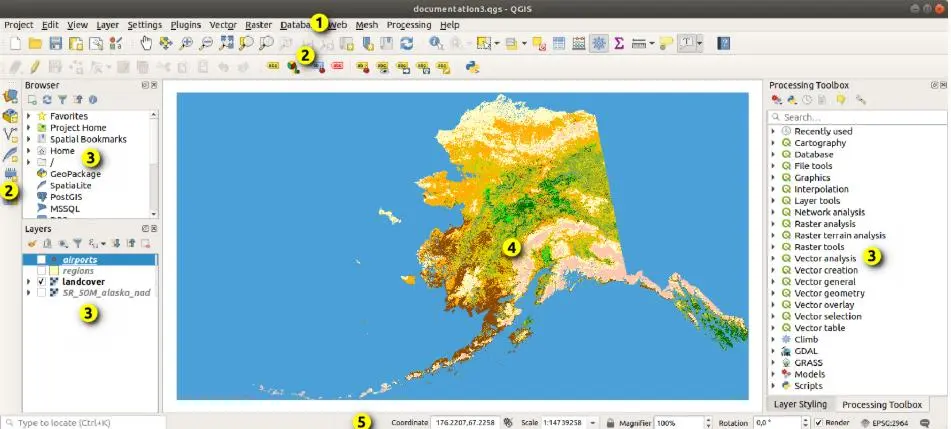
Let’s go through each one.
For QGIS for Beginners, being aware of the menu bar functions is essential for efficient use.
1. Menu bar. (Top section.)
The menu bar gives access to all major functions in QGIS.
Important menus:
- Project: new, open, save, project properties.
- Edit: undo, redo, cut, copy, paste,
- View: manage panels and toolbars,
- Layer: add layers, create layers, manage data sources,
- Settings: options, projections, customizations
- Plugins: install, manage plugins,
- Raster: raster tools (clip, merge, convert)
- Vector: geoprocessing, special tools,
- Processing: toolbox for advanced operations,
- Help: documentation.
2. Toolbars Quick Access Icons
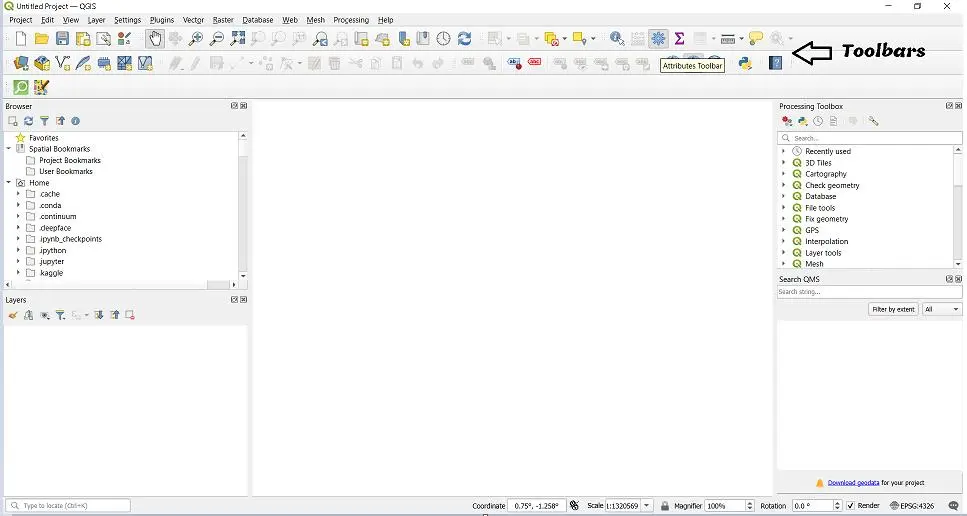
Toolbars give fast access to frequently used actions.
- Common Toolbars
- Attributes Toolbar
- Digitizing Toolbar
- Map Navigation Toolbar
- Roster Toolbar Vector Toolbar
- Plugins Toolbar
Examples
- Add Layer Zoom In/ Out
- Pan
- Select Features
- Measure Distance
- Identify Tool
- Save Project
3. Panels
Panels appear on the left or right side of the interface. They help manage data, layers, and maps.
Important Panels
A. Layers Panel
Displays all the layers loaded in the project. You can arrange layer order, hide, slash, show the layers, change symbology, group layers, remove layers.
B. Browser Panel
Similar to File Explorer, lets you quickly navigate and import shapefiles, raster images, databases, geopackages, csv files.
C. Processing Toolbar
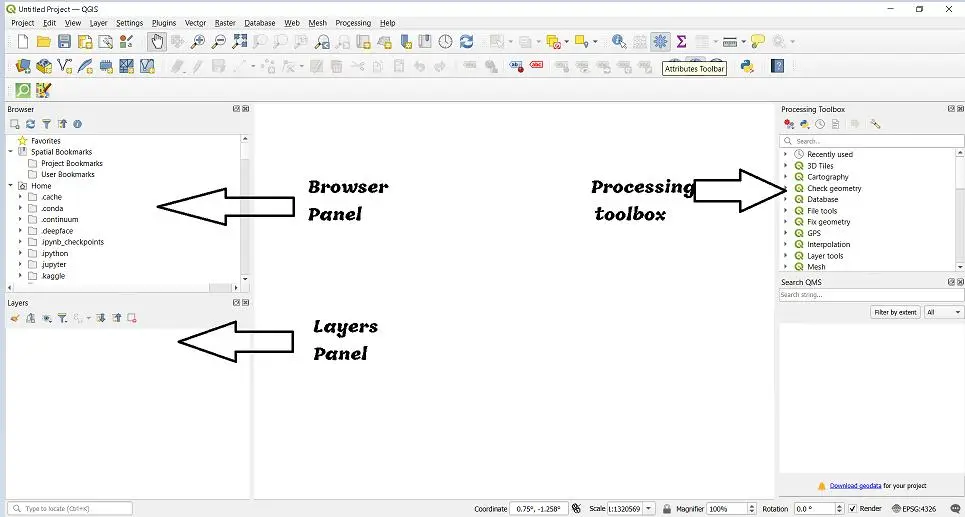
Contains advanced tools,
- Buffer: Creates zones around features
- Clip: Cuts one layer using another layer.
- Dissolve: Merge features based on attributes.
- Intersect: Finds overlapping areas between layers.
- Raster Calculator: Performs calculations on raster datasets.
- spatial statistics: Analyzes spatial patterns and distributions.
4. Map Canvas Center Workspace
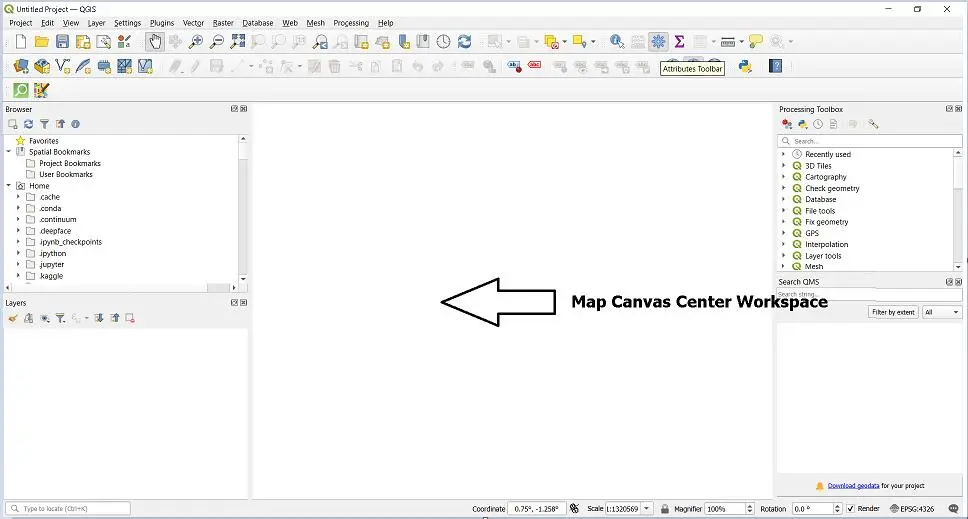
This is where all your maps are displayed. You can use satellite images, shapefiles, schematic maps, heatmaps, status bar. Bottom section displays important information, mouse coordinates, scale, current projections, CRS, map rendering status.
5. Status Bar (Bottom Section)
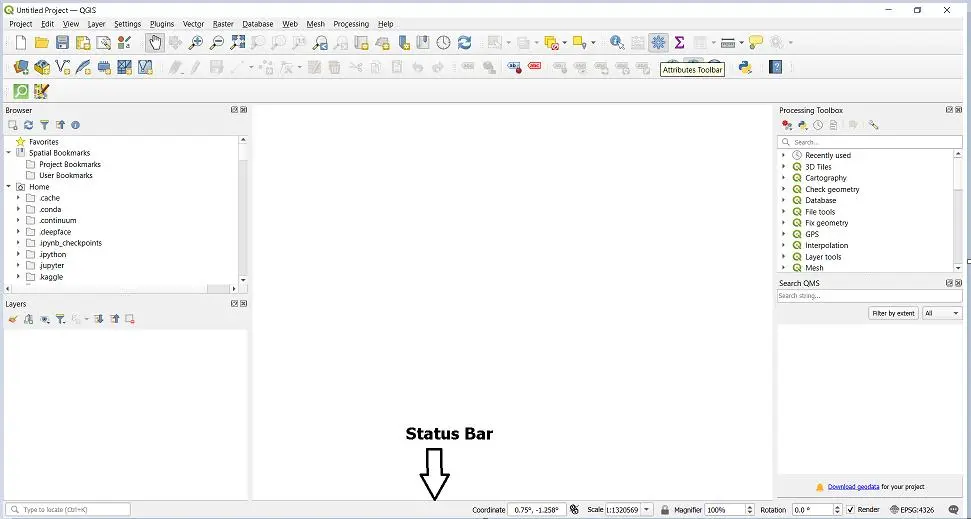
Displays real-time information about the map and the current project.
Using QGIS for Beginners, you can manage data and layers effectively through the panels.
- Mouse Co-ordinates: Display location of the cursor
- Scale: shows how zoom in or out the map is,
- Current Projection(CRS): indicates the coordinate system in use
- Map Rendering Status: shows progress with the map is loading or updating.
Tips for beginners.
- Start by importing simple data like state boundaries.
- Use the identify tools to understand attributes.
- Explore symbology setting for map styling.
- Use quick map service plugin to load satellite base maps.
- Save the projects frequently.
Final thoughts
QGIS has everything a beginner needs to start mastering GIS, from map visualization to advanced spatial analytics. Once you understand how to install it and how each part of the interface works, you will be able to perform real-world GIS tasks with confidence. This combined guide gives you the foundation you need.
For an in-depth understanding, please refer to our book, “Academic Research Fundamentals: Research Writing and Data Analysis”. It is available as an eBook here, or you may purchase the hardcopy here .
By engaging with the map canvas in QGIS for Beginners, you’ll learn to display and manipulate your data.
Tips for QGIS for Beginners include starting with simple data to build confidence.
Finally, QGIS for Beginners will provide you with the tools needed to start building your GIS skills.